5.25.2015

guacamole white bean dip


Lately I just can't get enough avocados! I recently discovered the joy that is avocado toast, and I'm obsessed. My kids don't really like avocados, which means that I get to enjoy the abundance of avocados I've been buying without two little people asking me for bites and stealing food off my plate. Sweet! I found myself with an abundance of avocados this week and whipped up this delicious guacamole white bean dip in less than five minutes. It is so incredibly easy to make and delicious too! It uses just a few very simple ingredients, plus it's gluten free, dairy free, and vegan!


I don't usually eat gluten free, but my little sister has a gluten sensitivity and at times it has been a little challenging coming up with yummy party food that we can all enjoy. I was offered some Breton Gluten Free Black Bean with Onion and Garlic crackers to try, and they were the perfect complement to this delicious dip!


I love that they are made with beans as the main ingredient, and each serving provides 2 grams of fiber and 2 grams of protein. They are also certified gluten free by the National Foundation for Celiac Awareness Gluten Free Certification Program. The best part about them is that they taste great! This guacamole white bean dip with Breton Gluten Free Black Bean crackers is definitely going to be on the menu for our next family party!

Guacamole White Bean Dip

1 (14 ounce) can of great northern beans, rinsed and drained
1 large ripe avocado
2 teaspoons fresh lemon juice
2 tablespoons olive oil
1 tablespoon minced garlic
1/2 teaspoon salt
1/4 teaspoon pepper
1 small ripe tomato, diced
chopped cilantro or parsley, for garnish (optional)
Breton gluten free crackers, for serving

Add the beans, avocado, lemon juice, olive oil, garlic, salt, and pepper to a food processor or blender and blend until smooth and creamy. Add additional olive oil as needed to reach a smooth consistency. Top with diced tomatoes and cilantro (if desired). Serve with Breton gluten free crackers and enjoy!

I was selected for this opportunity as a member of Clever Girls and the content and opinions expressed here are all my own.
Hungry for more from The Baker Upstairs?

1.28.2015

chicken and veggie pizza


If there's one thing my family can't get enough of, it's pizza. I really think my husband Geoff could eat it every single night for dinner and never complain. Whenever I mention that I'm tired or stressed and not up to cooking dinner, his first response is "Let's order pizza!" While I do enjoy pizza myself, I'm not thrilled about how unhealthy some of the take-out pizzas can be. There's a place near us that has fantastically delicious pizza, but it is literally dripping with orange grease. The only real solution is to make pizza at home! 

Not only is making pizza at home generally a lot more cost effective, it's also a lot easier to choose healthy options, like using whole wheat crust, or adding more veggies. Check out this infographic from Fleischmann's showing the benefits of making pizza at home:  


I had no idea that pizza was the #1 dinner choice in the U.S. It's definitely the #1 choice in my house! When Fleischmann's challenged me to create a healthy pizza using their awesome pizza crust yeast, I was excited. I decided to make a whole wheat crust (my first ever!) and load it with garlic, olive oil, spinach, chicken, artichoke hearts, kalamata olives, sun dried tomatoes, and cheese. The result was a delicious, healthy, incredibly flavorful pizza that I felt good about serving to my family!


I had never had kalamata olives on pizza until a month or so ago, and they are so delicious! They add so much flavor without being overpowering. This pizza is definitely a new favorite!
Chicken and Veggie Pizza

for the crust:
1 packet Fleischmann's pizza crust yeast (or rapid rise yeast)
3/4 cup whole wheat flour
1 - 1 3/4 cups all purpose flour
1 1/2 teaspoons sugar
3/4 teaspoon salt
2/3 cup very warm water
3 tablespoons oil (I used olive oil)

for topping:
2 tablespoons olive oil
2 teaspoons minced garlic
1/2 cup chopped cooked spinach
1 1/2 cups shredded mozzarella cheese
1/4 cup chopped kalamata olives
1/2 cup chopped artichoke hearts
2 tablespoons chopped sun dried tomatoes
1 cup chopped cooked chicken
1/2 cup shredded gouda cheese

Preheat the oven to 425. To make the crust, whisk together the yeast, whole wheat flour, all purpose flour, sugar, and salt in a large bowl. Add the warm water and olive oil, and mix to combine, adding more flour as needed to make a smooth, non-sticky dough. Knead until smooth, then let rest 10 minutes.

After the dough has rested, roll the dough out to the desired size and place on a lightly greased pizza pan or baking sheet. Drizzle with olive oil and top with minced garlic, spreading the oil and garlic to cover the dough. Sprinkle with the chopped spinach, distributing evenly over the crust. Top with the shredded mozzarella cheese, followed by the olives, artichoke hearts, sun dried tomatoes, and chicken. Cover with the shredded gouda cheese. Bake in the preheated oven for 12-15 minutes, or until the cheese is melted and bubbly and the crust is browned. Enjoy!

crust recipe via Fleischmann's Yeast


For more great pizza recipes, check out the Fleischmann's Yeast website. I'm dying to try some of their delicious recipes, like their mango chutney chicken pizza... yum! Cheers to family pizza night!


Hungry for more from The Baker Upstairs?

11.12.2014

double chocolate mint cookies


Why, yes, it is November, and I'm already posting a Christmas recipe! I know, I know… I'm all for letting Thanksgiving have its due, and I agree that things are getting ridiculous when the stores have Christmas decorations up before Halloween. But… when I start seeing those holiday baking supplies set up in the store, I just can't stop myself. It's a compulsion, really. Anyway, these double chocolate mint cookies are super delicious, and it really wouldn't be fair not to share them with you right now. :) If you, like me, are trying to plan things out ahead of time for the busy holiday season, then these cookies could be a big help to you in planning a cookie exchange party or thinking up a yummy gift for the neighbors!

I was invited to create a holiday recipe using Bob's Red Mill flour, and was given some flour to try. I've used a lot of Bob's Red Mill products in the past, and I particularly love their whole wheat pastry flour. I was excited to try the organic unbleached white all-purpose flour in these cookies, and it definitely did not disappoint! I really like that it's freshly milled and not enriched with any additives (heaven knows there are way more than enough of those in our food already) and that it is professional quality, high protein flour. The flour has such a fine, even grind that it feels almost silky to the touch, and it is very versatile and easy to work with.


I've been dying to try a chocolate version of my favorite sugar cookie recipe for a while now, and this was the perfect excuse. Armed with my awesome flour and some Andes creme de menthe baking chips, I created a luscious chocolate cookie that is soft and gooey, with just the right amount of mint. (My mint-hating kids both loved these, so the mint flavor is definitely not overpowering.) They're the perfect cookies for dipping in hot chocolate on a snowy day!


Double Chocolate Mint Cookies

8 tablespoons butter, softened
3/4 cup sugar
1 large egg
1 teaspoon vanilla
1 cup Bob's Red Mill organic unbleached white all-purpose flour
1/2 cup cocoa powder
1/4 teaspoon salt
1 teaspoon baking powder
1/2 teaspoon baking soda
1 teaspoon cream of tartar
3/4 cup Andes creme de menthe baking chips
3/4 cup mini chocolate chips (plus more for sprinkling on top)

Preheat the oven to 350. Line two baking sheets with parchment paper or spray with cooking spray. In a large bowl or the bowl of a stand mixer, cream together the butter and sugar until light and fluffy. Add the egg and vanilla and mix well to combine. In a medium bowl, whisk together the flour, cocoa powder, salt, baking powder, baking soda, and cream of tartar. Add the dry ingredients to the wet ingredients and mix to combine. Fold in the creme de menthe baking chips and the mini chocolate chips. Roll the dough into one inch balls and place 1 1/2 - 2 inches apart on the baking sheet. Sprinkle each ball of dough with a few extra mini chocolate chips. Bake 8 minutes, then remove and let cool on the baking sheet for 10 minutes before removing to a cooling rack. These cookies are my favorite when they are still a little warm and the chocolate chips are slightly melted. Enjoy!
Click here to download a $1 off coupon for any Bob’s Red Mill product, and best of luck to you in all your holiday baking!


I was selected for this opportunity as a member of Clever Girls Collective and the content and opinions expressed here are all my own.
Hungry for more from The Baker Upstairs?

10.28.2014

perfect homemade pizza + tips for family pizza night!


I was given pizza making tools and compensated for my time by Fleischmann's. All opinions are my own. 

If there's one thing my family loves, it's pizza night! My husband Geoff, especially, loves pizza, and my girls think it's a party whenever I make or serve pizza. I love that pizza is so fun and versatile, and you can make pretty much any combination you can dream up! I've been making my own pizza at home for a few years now, but I've gotten kind of tired of the same old recipe. I have especially struggled with the crust and getting that perfect crispy, chewy texture that I love so much. When Fleischmann's offered to send me some pizza-making tools and included their new pizza crust yeast, I was excited to give it a try!


I have to say, I am honestly really impressed by how well it works for pizza. It's really easy to use, basically foolproof, and doesn't require a rise time (how awesome is that?). It gives the pizza crust the perfect chewy, crispy texture! I had the crust ready in no time, and then we were ready for family pizza night. I mentioned earlier this week that I'm trying really hard to let the "fun mom" in me triumph over the "control freak mom," and I thought this would be a perfect opportunity to let the girls make their own pizzas. I set out a bunch of possible toppings for them, and let them go to work!


Lizzy mostly wanted cheese and sausage on her pizza, and piled it all in the middle of the pizza. Abby enjoyed layering some cheese, then pepperoni, then more cheese, then more pepperoni, etc.


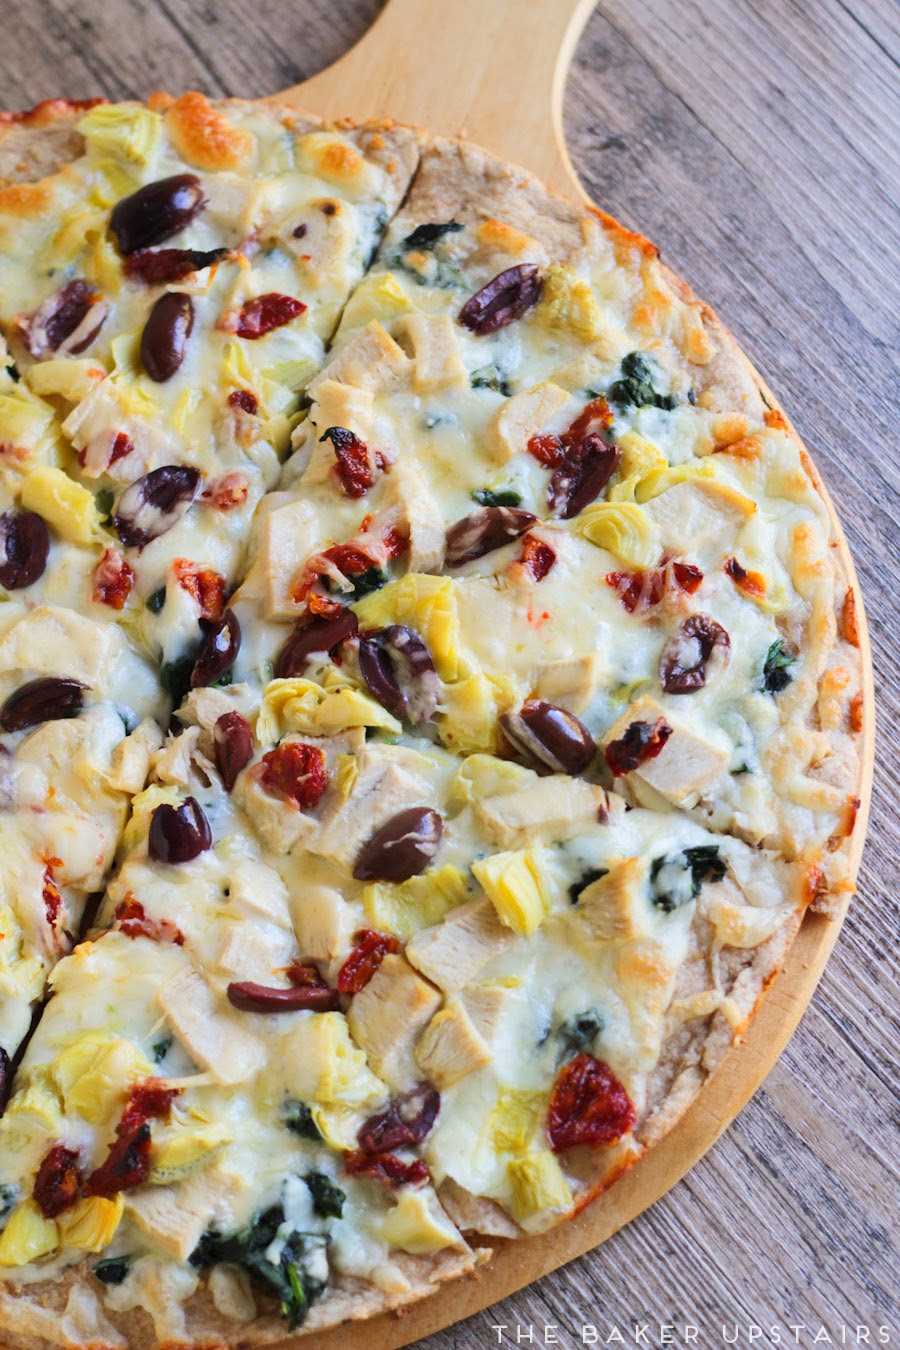
They both had a really fun time, and were super proud of their pizza creations. They both tend to be picky at times, and I think they were both a lot more excited about eating the finished product because they had made it themselves. For Geoff and I, I made a pizza loaded with pepperoni, turkey sausage, green peppers, olives, and mushrooms. Yum!


Since I'm always trying to plan ahead for busy days, I made a few extra mini pizzas for the girls to have for lunch later in the week. I was inspired by the adorable creepy mini pizzas on the Fleischmann website. How perfect are these for Halloween? My girls loved them and my daughter Abby even tried the green peppers on the spider pizza, since she thought it was so cute and fun. That's definitely a first for her!


Perfect Homemade Pizza
(makes one 12 inch pizza)

1 3/4 - 2 1/4 cup flour
1 envelope Fleischmann's Pizza Crust Yeast
1 1/2 teaspoons sugar
3/4 teaspoon salt
2/3 cup very warm water
3 tablespoons oil

for topping:
olive oil
pizza sauce
shredded cheese (I used a store bought pizza blend this time, but I usually use a mix of mozzarella and provolone)
other toppings of your choice: pepperoni, sausage, mushrooms, olives, onions, green peppers, etc.

Preheat the oven to 425. In a large bowl or the bowl of a stand mixer, mix together one cup of flour, and the yeast, sugar, and salt. Add the warm water and oil, and mix to combine. Add the remaining flour, 1/4 cup at a time, until the dough pulls away from the sides of the bowl to form a ball. Knead on a floured surface until smooth and elastic. Let rest 10 minutes.

Lightly grease a baking sheet or pizza pan. Press the pizza into the desired shape and brush the crust lightly with olive oil. Spread with pizza sauce and top with shredded cheese and toppings of your choice. Bake 12-15 minutes, or until the crust is golden brown and the cheese is melted and bubbly. Enjoy!

recipe via Fleischmann's


Fleischmann's has a wide variety of recipes and resources to make pizza night easier and more fun for your family! My kids can't wait for our next pizza night, and since it's so fun and easy to make, I'm excited too!
Hungry for more from The Baker Upstairs?

10.20.2014

chicken parmesan sliders + free printables!


I was asked to participate in the #scarytastyeasy campaign, sponsored by Tyson at Sam’s Club. Although I have been compensated, all opinions are my own.

Happy Monday! Who else is super excited for Halloween? I absolutely love this time of year and look forward to it all year long. The past few years we've always had things come up during the month of October and haven't been able to do all of our fall traditions, but this year (through sheer force of will on my part, I think) we've actually managed to cross a lot of things off our fall bucket list. We've made caramel apples and Halloween sugar cookies, we've seen the pretty fall leaves and visited the pumpkin patch, and we've got plans for some fun Halloween parties. And speaking of Halloween parties, these chicken parmesan sliders make the perfect party food! They are super quick and easy to make, and so tasty too!

I was asked to create a fun party food recipe using Club Tyson products from Sam's Club. I actually hadn't been to Sam's Club before, but luckily they offer a totally free one day pass! How cool is that? I actually think that's a really smart idea, because it's nice to know what kinds of products they sell and what the general shopping experience is like before committing to a year membership. My three year old Lizzy and I visited Sam's Club a few weeks ago and had a great time.


We stopped by customer service and picked up our one day pass, and then we were off shopping. Lizzy loved all the fun fall things we saw, like giant beautiful pumpkins and fun Halloween costumes. They have pretty much everything you need to throw an awesome Halloween party! I really liked the variety of items they sell, and the prices were great! One thing I also really liked is that they sell milk by the gallon instead of in two-gallon packs. My family aren't big milk drinkers and we pretty much never finish 2 gallons before the milk goes bad. One gallon is perfect for us! I also really liked the variety they had of frozen Tyson chicken… they had nuggets, wings, chicken patties, and these awesome crispy chicken strips.


They're perfectly seasoned and ready in under thirty minutes, which makes them perfect for a busy mom like me! I love sandwiches, so I thought it would be really fun to make them into some easy chicken parmesan sliders. And because I'm an overachiever, I decided to make them even more fun with some cute Halloween tags!


I just printed them out, cut them into circles with my 1 1/4 inch circle cutter, and taped them to some toothpicks. Easy peasy! If you would like to download them to make your own cute tags, you can download a version with cutting guides here or a version with no guides here.

These sliders are perfect for a party or as a quick meal for your little trick or treaters. My whole family loved these and can't wait for me to make them again!

Chicken Parmesan Sliders

12 small slider buns
2 tablespoons butter, melted
1/2 teaspoon garlic powder
1 teaspoon dried parsley
6 Tyson Crispy Chicken Strips
12 slider-sized pieces of mozzarella cheese
12 tablespoons marinara sauce

Preheat the oven to 400. Split the slider buns in half and spread each half with melted butter. Sprinkle with garlic powder and dried parsley. Bake 8-10 minutes or until lightly browned, then remove from the oven and set aside. While the buns are baking, bake the chicken strips for 18-20 minutes, or until heated through. Remove from oven and cut each strip in half. Place half of a chicken strip on each of the bottom slider buns, then top with 1 tablespoon marinara sauce and a slice of mozzarella cheese. Bake 5-10 minutes or until the cheese is melted. Top with the other halves of the slider buns, then add a cute Halloween tag before serving. Enjoy!


If you are looking for more #scarytastyeasy Halloween recipes, check out the Club Tyson Pinterest board or the #scarytastyeasy Pinterest board for great ideas for your Halloween party!

Hungry for more from The Baker Upstairs?